
The Rule Of Thirds in Photography: What, Why, and when to break it.
The rule of thirds is probably one of the first “rules” a new photographer will come across. And for good reason. It’s used all the time, not just in photography, but in almost every film or TV show you’ve ever seen.
So what is the rule of thirds exactly? When should we use it effectively, and when can we throw out the rulebook and ignore it entirely? Let’s find out.
The Rule Of Thirds: What the heck is it?
It’s a composition concept where we split out our image into three, and use these lines to help you compose your images better. You can add guidelines on most cameras, and I suggest turning them on if your camera allows it. I use mine all the time on my Lumix cameras. You can also use guidelines on your phone as well. This is a good tip so you get used to seeing it and can practice your composition even when you’re taking a quick photo on your phone.
So we have a grid with some lines on it. What now?
Now, we try to line up the subject of the image on one of these lines. Whether it is science, art, or just familiarity, you will notice straight away that the image is much more pleasing. And it can level up a beginning photographer almost straight away as one of the key beginner mistakes is that they stick the subject smack bang in the middle of the frame. I mean, it makes sense? You’re taking a photo of THIS, so you want to put it front and centre, right? Well… sometimes… but generally, using this technique will work better.


You can see in these examples that I’ve got my subjects right on one of the lines — usually using their eyes as an anchor point — and I’ve also in addition to that tried to line up some of the landscape to one of the horizontal lines. You can compose using multiple lines in one single image. The first image I think works very effectively as we have the foreground on the bottom line, and the background on the top line, with our subjects nicely lined up.
P.S. it was a bit nerve-wrecking on that edge! It’s at Horseshoe bend in Arizona. Click on the images to see them better.
This technique works both for portrait and landscape shots. And it works hand in hand with other techniques too, like leading lines, and negative space. Let’s briefly to over those here. The ceremony photo below shows a good example of leading lines. The aisle is mirrored and bow inwards towards the subjects at the centre. Here, the lines are being used to frame the aisle rather than the subject. But it still follows the rule as the key parts are on the lines.
The second image, the portrait, uses negative space. There isn’t much going on to the left of the couple (behind some lovely lighting!) so we are drawn to them much more. I’ve used the bride’s eyes as my anchor point, and we have enough of the frame empty that it works quite well.


OK. So, subject on a line. Job done? Not quite.
Remember as photographers it’s the whole image we need to concern ourselves with. The other two thirds of the frame need your attention just as much as your subject.
Try to avoid having the rest of the frame being too messy, as that will only take away from the subject of the photo. Negative space, and leading lines are a great way to tidy up the rest of your frame. So keep them in mind when you’re composing your images.
Versatile
The great thing about the rule of thirds technique is, generally speaking, it works brilliantly for any style of photography. Landscape? Portraiture? Astrophotography? All good. It’s ideal for product photography, weddings, for EVERYTHING! It’s something that maybe you should try out first and foremost in any photography situation before experimenting with other things.


But, let’s remember: it is only a rule. And all rules can be broken. When is a good time to ignore the rule of thirds?
Symmetry is a great composition style which doesn’t lend it’s self too well to rule of thirds.
Shooting in a 1:1 ratio can also make the rule of thirds quite challenging.
Reflections in water or mirrors etc don’t often work.
Sometimes weird compositions that don’t make sense on paper just work!
Some fantastic portrait photographers own their subject in the heart of their photos, and sometimes it can be very effective indeed. Here are some examples where you can use it either partially, or not at all, and it still sort of works. You can see in the portrait, I have missed her eyes, and haven’t left enough negative space to place her to one side in the frame. But I still quite like it?
And the reflections are definietely breaking the rule. I wanted to emphasise the mirror image and so I opted to stick it in the middle, rule of thirds be damned! It sort of follows some of the lines though, as the middle tree is more or less centred in the grid. But mostly it’s a rule-breaker. And I, for one, love it.


Use rule of thirds in editing.
While it’s always better to get this stuff right in-camera, sometimes we don’t. But all is not lost.
If you’ve taken an interesting photo and it isn’t quite working out for some reason, you can always adjust the crop in your editing software. I often try out different styles in post production, and it can create something new and fresh that maybe you didn’t spot on the day of shooting. Cameras with larger megapixel counts are best for this then you don’t lose any resolution.
Here are some key tips.
Horizons: pay special attention to them
Horizons have the power to make or break an image, and the rule of thirds grid can come in super handy. First of all, you can use your grid to keep your horizons straight. They probably should be straight, like, 90% of the time unless you’ve going for something really jaunty.
And secondly, a horizon is such a divisive line through your image, if you don’t follow the rule of thirds you can risk splitting your image in two, and making the composition less pleasing. The reflection image above is a good example of how you can do it effectively, but for every time it works I think there are ten times it wouldn’t.
I often ask myself a quick question before shooting: do I want the land or the sky to be more of a focus? And then I’ll stick my horizon either on the bottom or top line depending on what I prefer. Hell — we’re shooting digital most likely, take one of each and make your mind up later.
But if you trap your horizon in the centre of the image, I find it very limiting. I’m not saying it can never work, but it’s just a general thing to keep in mind.


Here, the first image is the one I took… with the horizon right in the middle. I was trying to be fancy, I think, or maybe I was distracted by the doggo. I don’t know. But It ain’t one of my best, let’s put it that way. Now, I didn’t compose it correctly at all. I find the cropped-in-post version much more pleasing to my eyes. And speaking of eyes…
Eyes: a great guide line to use
Eyes are the window to the soul, they say. Or at least the window to our portraits. It’s why getting the eye composed correctly can make or break an image. For instance, your subject can be dead-centre — technically bending the rule of thirds rule — but if you line their eyes up with the top line of the rule of thirds grid, it will balance the image and make it better.
You don’t always have to put their body on the line, it can be their eyes, their shoulders, something else in the frame entirely. The rule of thirds helps you come up with creative images while at the same time helping you create pleasing compositions without having to think too much about it.


Rule of Thirds For Video
Keep the rule of thirds in mind for your video as well. I think it’s probably harder to convincingly break the rule for video, because everything we consume through TV and Film looks a very stylistic way. Watch a two-way conversation next time you’re watching TV, and you’ll notice it straight away.
I think with video, you need to break the rule intentionally or risk being labelled an amateur. If you break it at a key point in your video for effect, it can be awesome. If there’s a random shot here and there that doesn’t follow the pattern, then it’ll stick out like a sore thumb.
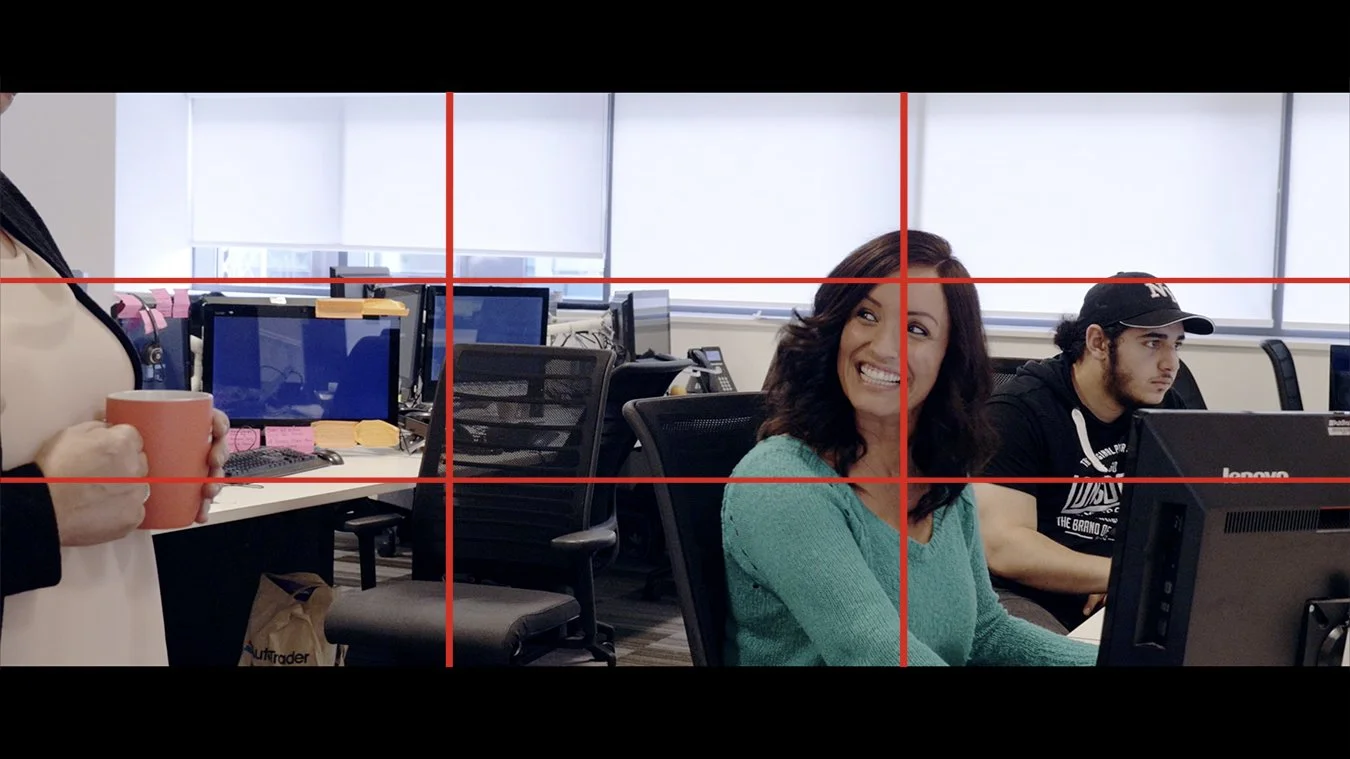
Here are some screenshots from a short film I directed not too long ago. I tried my best to stick to the rule of thirds and I think it looks quite authentic to the scene layouts you’d see on TV.


Don’t overthink it
So there we go! A crash course in the rule of thirds. I hope you found it helpful, and I hope you can apply this technique to your photography and video projects going forwards. Just remember to have fun with it and don’t ever sacrifice your creativity for the sake of strictly following any particular rule.
Go forth and create, Nerds!